How to Install Eyedro Sensors
How to Install Eyedro Sensors
How to install Eyedro sensors is a common question. Installation of the Eyedro electricity monitor is quite simple, and it starts with the sensors. Although we always recommend an electrician install the sensors, it is quite common for a home owner to install their own. The typical residential installation of the sensors inside the electrical panel looks like this:

Electrical Panel with Eyedro Sensors Installed
Notice how there is a sensor around both of the “hot” lines entering the panel, but not the ground or neutral line. The sensors are not directional, meaning Eyedro can be used to monitor power generation just as easily as power consumption. They’re also hinged to simplify installation.

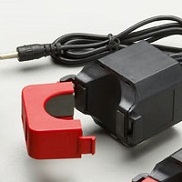
Eyedro Sensor – Shown Open
Also, be sure to confirm the rating on the sensors you’re installing are sufficient for your application. At the time of this writing, Eyedro only sells a 200A sensor (red and black).
Simply clamp the eyedro sensors around the “hot” wires that are to be monitored, and ensure the sensor “snaps” closed. Next step is to route the sensor wires through the side of the electrical panel and out to Eyedro sensor module (black box). Here is a video by Jamie Boyd at Boyd Electrical that should also help.
For additional information regarding installation of the eyedro sensors, please consult the eyedro product manual.