by Andrew Taylor | Mar 16, 2020 | Blog, How-to Guide
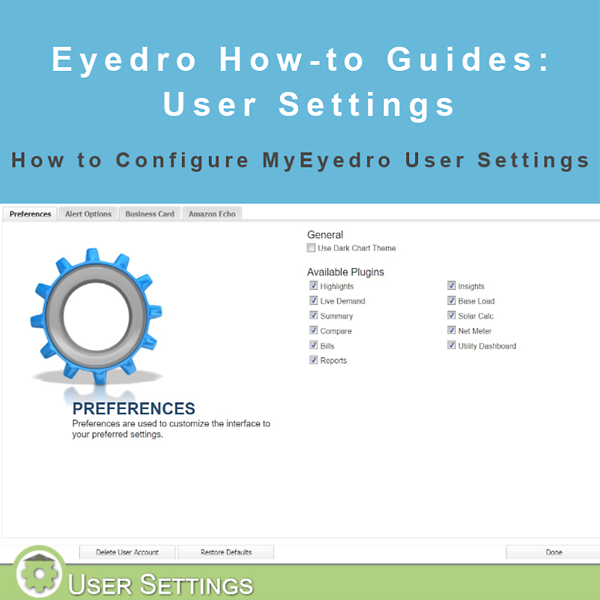
How to Configure User Settings
Purpose:
This post will explain how to configure User Settings in My.Eyedro.com.
Instructions:
- Click on the gears in the upper right-hand corner of the page (this is the main menu).
- Select User.
- The account email address is listed here.
- You can change your password by clicking on the Change Password button.
- You can delete your account by clicking on the Delete User Account button. Important: this process cannot be undone! While you will be able to reclaim your devices in a new account, any settings or reports will need to be set up again.
- You can reset User Settings to defaults with this button.
- When you are finished, click the Done button to close User Settings and return to the plugin you were viewing previously.
- The Preferences tab allows you to set the Dark Chart Theme (if you prefer), and enable the plugins that you want to use.
- The Alerts tab allows you to turn email alerts on or off from My.Eyedro.com (currently in beta testing). You can also set other email addresses to send alerts to, limit when alerts are sent and how many alerts will be sent per day. As noted on the page, you still need to sign up for individual alerts (in Device Settings).
- The Business Card tab allows you to either upload an existing business card or set one up. This will cause an image of the card to show up in plugins when viewed. This option is primarily for corporate clients.
- The Amazon Echo tab is used primarily to record the Echo account your My.Eyedro.com account is linked to.

MyEyedro User Settings Preferences tab

MyEyedro User Settings Alert Options tab

MyEyedro User Settings Business Card tab

MyEyedro User Settings Amazon Echo tab
For more information:
To contact Eyedro Support:
Via web: Contact Us
by Andrew Taylor | Mar 15, 2020 | Blog, How-to Guide
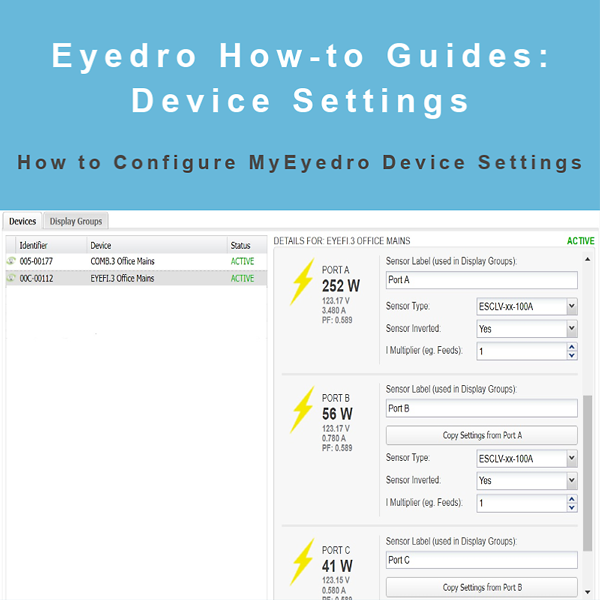
How to Configure Device Settings
Purpose:
To explain how to configure Device Settings in My.Eyedro.com.
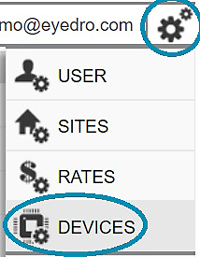
Devices From Main Menu
Instructions:
- Click on the gears icon in the upper right corner of the My.Eyedro.com page. This is the main menu.
- Select Devices in the menu.
- The default page is Display Groups, which is used to set up sensors in various ways to be displayed in the various plugins. This will be explained further beginning with step 12.
- The Devices tab is where you claim new Eyedro devices and where you can adjust some of the settings for the devices.
- To claim a new Eyedro Unit, click on the “Add Device” button in the lower left corner of the Device List.
- To remove an Eyedro device, for example, to give to another account, click on the “Remove Device” button in the lower right corner of the Device list. Important removing a device removes access to the data it has produced. If you need to access this information, but are getting rid of the unit, don’t unclaim the device.
- You can give the device a meaningful name, subscribe to alerts, check its Firmware version, MAC address, IP address, and signal strength here.
- Select Sample Mode and sample options here. Sample Mode is set either to Change Of State (COS) or Polled.
- Hide Advanced Settings is here. If you can’t see a setting you need to change, turning this off may reveal it.
- Sensor related data and settings are here. You can copy settings from the sensor above by clicking the “Copy Settings from…” button.
- When you are done adjusting the device settings click save. Important If you hit done without saving, your changes will be lost.
- To create a new Display Group click on the display group tab, then click on “Add Display Group” button on the lower left corner of the Display Group list. Note that to view a Device’s data, its sensors need to be in at least one display group but can be in several.
- To delete a Display Group and any settings associated with it, such as Sharing and Reports, click on the “Remove Display Group” button in the lower right corner of the Display Group list. Note that this will have no direct effect on Rate Profiles or Devices.
- The other tabs in the Display Group tab are Sharing and Export. Sharing allows you to create read-only Display Groups to share with other My.Eyedro.com accounts. If you share with an account that doesn’t exist, the account will be created. Export allows you to download the data of the Display Group for more detailed analysis. See Exporting Data in The Myeyedro User guide for more details.
- If you don’t want to keep your changes, click Cancel.
- Any time you make changes, click the refresh button.
- When you are done setting up your devices and display groups, click the Done button.
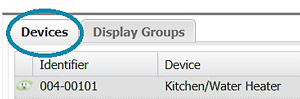
Devices Tab

Devices Settings

Add device by serial number

Configuration tab

Sharing tab

Export tab
For more information:
To contact Eyedro Support:
Via web: Contact Us
by Andrew Taylor | Mar 14, 2020 | Blog, How-to Guide
How to Set Up MyEyedro for the First Time
Purpose:
To explain how to set up MyEyedro for the first time and add your first device.
Instructions:
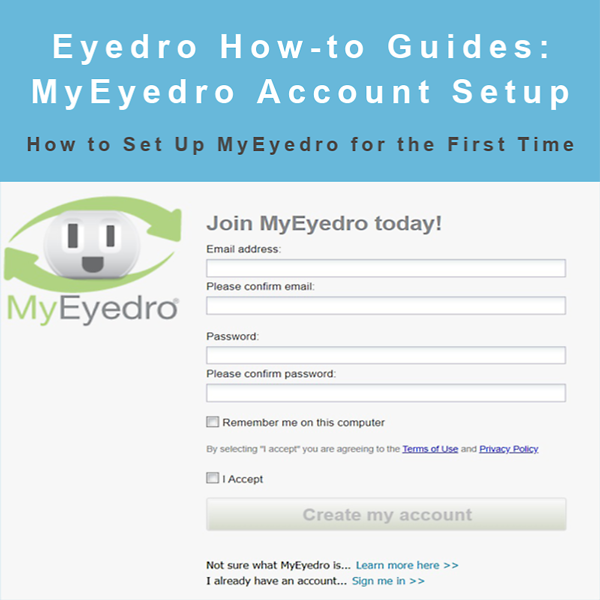
- Go to my.eyedro.com
- Click on the Sign up now link next to New to MyEyedro?
- Enter a valid email address and confirm it.
- Enter a secure password and confirm it. A secure password typically has at least one capital, one number and one special character (!@#$%^&*_-+=).
- Optionally click Remember me on this computer.
- Read the terms of use and privacy policy.
- Click I Accept. Note that doing this is agreeing to the terms of use and privacy policy
- Finally, click the Create My Account button.
- Once you log in for the first time, you will be taken to the welcome screen.
- Click on the Yes, open System configuration button.
- Click on the Add Device button in the lower left of the devices list.
- Click on Eyedro in the list.
- Enter your Device’s serial number (located on the back of the unit).
- Optionally set a meaningful device label so you know what this device is measuring.
- Click the Claim Device button. Note that the device must be plugged in and connected to the internet.
- Congratulations, you are now ready to start monitoring your electricity consumption!

MyEyedro Signup

Create MyEyedro Password

Open System Configuration

Add an Eyedro device

Device Serial Number Label

Add Device to MyEyedro

Claim device by serial#
For more information:
Suggested next reads:
To contact Eyedro Support:
Via web: Contact Us
by Andrew Taylor | Mar 12, 2020 | Blog, How-to Guide
How to Connect an EYEFI to the Internet
Purpose:
To explain how to connect an EYEFI electricity monitor to the internet.
Instructions:
Before you will be able to access your new Eyedro EYEFI device via the MyEyedro (my.eyedro.com) cloud service, you must first provision your device to communicate with the internet.
- To connect (provision) an EYEFI device, first plug it in with the provided power adapter. After a few moments, you should see a network created by your EYEFI device in your list of available WiFi networks (as shown below):

EYEFI in Available WiFi Network List
- Select the appropriate network from the list and click connect.
- Once connected to the Eyedro WiFi network, open a web browser and navigate to eyedro.com/setup (192.168.1.1/setup works too.)
- You should be presented with the Eyedro WiFi Settings page. Note that if you arrive at a different page e.g. your EYEFI’s local dashboard, you can click on the Network link at the bottom of the page which will take you to the Eyedro WiFi Settings page.
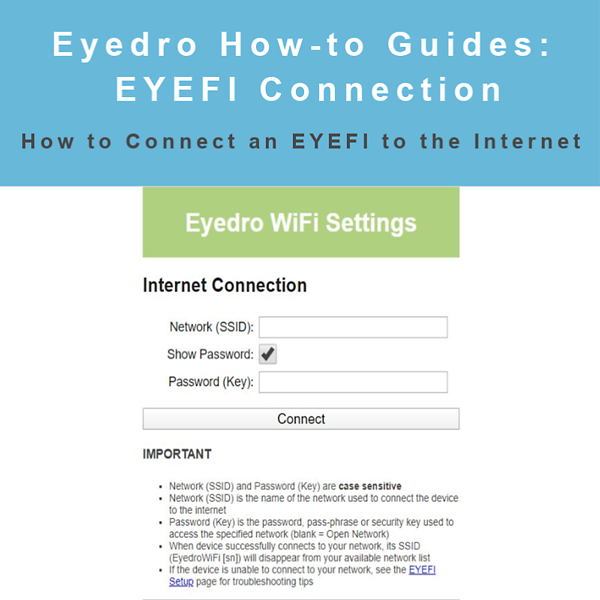
The Eyedro WiFi Settings page looks like this:

Eyedro WiFi Settings
On some EYEFI devices you may also see a security setting drop-down menu option. In this case, select WPA/WPA2 if your network requires a password. If no password is required, select Open.
- Enter your WiFi Network name (SSID) and Password (if applicable) into the appropriate boxes. Important! These parameters are CASE SENSITIVE. Inputting either incorrectly will cause the process to fail.
- Once you click Connect, you will be prompted to reconnect to your WiFi network.
If the process was successful, you will now be able to add your EYEFI device to your My.Eyedro.com account.
If the process was not successful, the EYEFI will reappear in your available network list. The most likely cause for this is an incorrectly entered network name or password – please double check the required credentials of the network you are connecting to, power cycle the EYEFI device and try again.
Note: If you are still having problems connecting and have changed the DNS settings in your router (i.e. to use an ad blocker), try switching back to use the default settings. Alternately use Google’s DNS servers 8.8.8.8 (primary) and 8.8.4.4 (secondary).
For more information:
To contact Eyedro Support:
Via web: Contact Us

by Andrew Taylor | Mar 1, 2020 | Blog, How-to Guide
How to Contact Eyedro Technical Support
Purpose:
To explain how to contact Eyedro Technical Support to get Eyedro hardware or MyEyedro software issues solved in a quick and efficient manner.
Instructions:
- Before you contact Eyedro Technical Support Email, make sure that the device in question is still plugged in, as sometimes plugs get knocked out when someone uses the outlet for another device.
- Make sure you have the serial number/s of the device/s affected by the issue handy. This ensures that you won’t receive a response asking for a My.Eyedro.com account and/or serial numbers affected, thus increasing the time taken to resolve your issue. The device serial number is located on the label of each black module (see example below).
- Read the MyEyedro User Guide and Eyedro Product Guides first. Troubleshooting information can be found in the Eyedro Product Guide. Troubleshooting charts can also be found in the Eyedro Support menu. The manuals contain answers for common issues and often can be used to help you troubleshoot the issue yourself. Depending on the volume of contacts Tech Support may take one to two business days to respond to a ticket.
- Technical Support is available to respond Monday to Friday, 9 to 5 Eastern. Any support requests made outside of this time will typically be addressed within one business day.
- If you have not received a response in a timely manner, make sure you check your email’s spam folder as many email programs will incorrectly identify corporate responses as junk or spam.
Device Serial Number Label
For more information:
To contact Eyedro Support:
Via web: Contact Us

by Stacey McCuaig | Dec 4, 2018 | Blog, How-to Guide
Eyedro EYEFI Setup
It looks like you’ve missed a step in your EYEFI setupTo provision your EYEFI device, carefully follow these steps:
- Connect to the WiFi network created by your EYEFI device (EyedroWiFi [xxx-yyyyy] – where xxx-yyyyy matches the serial number).
- Open a web browser and you should be redirected to the network provisioning page. If not automatically redirected, go to http://192.168.1.1/network.
- Enter the Network Name (SSID) of the desired network to connect through (note that this field is case sensitive).
- Choose Security: WPA/WPA2 (PSK) or Open.
- If security is not ‘Open’, enter the Password of the desired network to connect through (note that this field is case sensitive).
- Click Connect.
- If your settings have been accepted by the device you will see the message shown below. IMPORTANT: This step will not notify you of errors in your entered information only that the device has received the information you provided.
If you continue to see the network created by your EYEFI device (EyedroWiFi [xxx-yyyyy]) in your available networks list, it means that it isn’t able to connect to the provisioned network for some reason. See troubleshooting tips below.
But I followed the steps…If you have followed all the provisioning steps above but your device is still not able to connect to your network, try these troubleshooting tips:
- If your computer is also connected to the internet via an Ethernet cable, please disconnect the Ethernet cable and retry the above provisioning steps.
- Please follow each step of the above provisioning process carefully.
- Please ensure your credentials (Network Name and Password) match exactly. The fields are case sensitive.
- Click the “Show Password” button so you can see the password text and ensure it is entered correctly.
- Ensure you are connecting to a 2.4GHz WiFi network.
- Use another WiFi device in your house (i.e your cell phone) to verify the signal strength of your 2.4GHz WiFi network at the point of EYEFI device installation. If your phone can’t see the WiFi network or the signal strength is very low, the EYEFI device will have the same issue.
- Try moving the EYEFI device (with power supply) into the same room as your wireless router to test if it can connect. Sensors can be left in the panel and just disconnected from the EYEFI device for this test.
- Connect your computer to the desired network and log into the router setup page – typically accessed by entering 192.168.0.1 from a web browser (see the user manual for your router for instructions).
- From your router’s setup page, ensure DHCP is enabled. DHCP is how the EYEFI receives an IP address required to communicate on your network and to the internet.
- From your router’s setup page, check if the device is connected to your network and has been assigned an IP address. There should be a list of connected devices on one of the configuration pages (see the user manual for your router for details).
- From your router’s setup page, ensure there is no firewall enabled that could be blocking (port 80) traffic to/from the EYEFI device.
- If you have changed the DNS settings in your router (i.e. to use an ad blocker), try switching back to use the default settings. Alternately use Google’s DNS servers 8.8.8.8 (primary) and 8.8.4.4 (secondary)