Add Rate Profile
To add a rate profile, navigate to the Rates Configuration plugin. Click the ‘Add Rate Profile‘ button. This will open a form which is used to specify the details.
- Effective Date. This date represents when the rate profile should start applying to the data from your devices. IMPORTANT: You must have an effective rate profile covering the span of all your data. Do not adjust the Effective Date of the first rate profile in your list. Instead, add a new rate profile.
- Bill Frequency. The bill period (how frequently you are billed). Supported billing periods are; Monthly, Bi-Monthly (every two months), and Quarterly (every three months).
- The bill start date is currently disabled and assumed to be the first of the month
- Rate Structure. Supported rate structures are; Fixed, Time-of-Use, Tiered, Daily Tiered and Tiered Time-of-Use. Once you have selected this, you can fill in the rate details on the other tab(s) in this dialog.
- Number of Seasons. If your rates vary seasonally, change the number of seasons field to create rate detail tabs based on the time of year. See section below for more information
- Weekend Rates. If you rates vary on weekends, you can check this box that will add more fields in the rate detail tabs. See section below for more information.
After you’re satisfied with the data entered, Click ‘Submit‘. The newly created rate profile will now appear in the list.
Seasons and Weekends
Seasons
Changing the number of season will change the number of tabs along the top of the Rate Profile Settings tab panel to match the number of seasons you have selected (1 to 4).
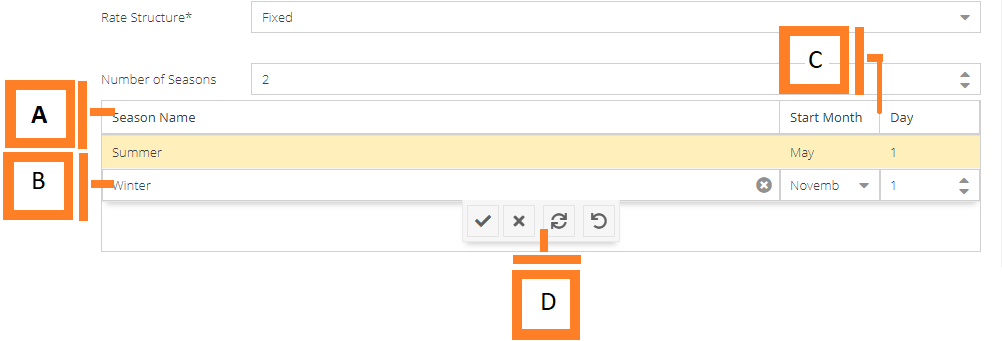
It will also show a new table that can be used to name and detail the season you have.
- Season Table. List of seasons to separate your rate details based on date.
- Season Row. Contains a label as well as the start month and day. Double click the row to edit the values.
- When editing a row, the start month column becomes a drop down field to make it easier to change the month. The day column becomes a numerical input field.
- Row Edit Controls. These controls are used to confirm, discard, or revert the changes you have made to the selected row.
Weekends
Enabling this option will change the rate details page. It will change the name of the rate table to Weekday Rates and add another table called Weekend Rates.


