Select Page

MyEyedro User Guide v5

  1. Introduction
    1. Account Access
    2. Signing In
    3. Signing Out
    4. Help & Support
    5. MyEyedro Mobile
  2. Plugins
    1. Highlights
    2. Demand - Live
      1. Temperature Overlay
      2. Demand Alerts
        1. Demand Threshold Average
        2. Demand Threshold Continuous
        3. Demand Threshold Instantaneous
    3. Consumption
      1. Consumption Alerts
        1. Consumption Threshold
    4. Bills
    5. Reports
    6. Net Meter
    7. Compare
    8. Utility Dashboard
    9. Meter
    10. Asset Intelligence
  3. Tools
    1. Data Exporter
    2. Base Load
    3. Peak Load
    4. Unit Converter
    5. Cost Estimator
    6. Solar Calculator
  4. Configuration
    1. User Configuration
      1. Opening User Configuration
      2. Change Password
    2. Site Configuration
      1. Opening Site Configuration
      2. Add Site
      3. Edit Site
      4. Delete Site
      5. Share Site
        1. Un-Share Site
    3. Rate Configuration
      1. Opening Rate Configuration
      2. Bill Profiles
        1. Add Bill Profile
        2. Edit Bill Profile
        3. Delete Bill Profile
      3. Rate Profiles
        1. Add Rate Profile
        2. Edit Rate Profile
        3. Delete Rate Profile
        4. Fixed Price
        5. Tiered
        6. Time of Use
        7. Daily Tiered
        8. Tiered Time of Use
        9. Other Fees
    4. Device Configuration
      1. Opening Device Configuration
      2. Add Device
      3. Edit Device Settings
        1. Gateway Module
        2. Electricity Module
        3. Pulse Module
        4. Temperature Module
      4. Delete Device
      5. Updating Device Firmware
      6. Active/Inactive Alerts
    5. Display Group Configuration
      1. Opening Display Group Configuration
      2. Add Display Group
      3. Edit Display Group
      4. Delete Display Group
      5. Share Display Group
        1. Un-Share Display Group
      6. Configure Alerts
    6. Report Configuration
      1. Opening Report Configuration
      2. Add Report Profile
      3. Edit Report Profile
      4. Delete Report Profile
      5. Report Types
        1. Net Meter
        2. Usage and Cost
        3. Usage and Cost with Graph
        4. Usage Ranking (Premium)
        5. Renewable Generation Metrics (Premium)
        6. Renewable Generation Ranking (Premium)
        7. Asset Metrics (Pro)
        8. Asset Ranking (Pro)
        9. Device Settings (Pro)
        10. Device Uptime (Pro)
        11. New Users (Branded Site Admin)
        12. User Metrics (Branded Site Admin)
      6. Scheduled Reports
    7. Alert Configuration
      1. Opening Alert Configuration
      2. Edit Alert Options
    8. Asset Configuration
      1. Opening Asset Configuration
      2. Asset Profiles
        1. Add Asset Profile
        2. Edit Asset Profile
        3. Delete Asset Profile
      3. Assets
        1. Add Asset
        2. Edit Asset
        3. Delete Asset
  5. Integrated SmartApps

4.3.3.1.Add Rate Profile #

Once you have created a bill profile, you can create a rate profile to attach to it. From the Rate Configuration page, click the “Add Rate Profile” on the right side of the screen

Rate profile list with the add rate profile button circled.

This will open up a new dialog window, this is what you will use to create the new rate profile.

Numbered image of the edit rate profile settings dialog to show the steps to add a new rate profile.


  1. First is to select the Effective Date, this date represents when the rate profile should start applying to the data from your devices.
  2. Next the Bill Frequency is when you are billed for you power consumption. this helps break down the data from your devices so it aligns with your billing period from you utility provider.
  3. The bill start date is currently disable, and assumed to be the first of the month
  4. The Rate Structure is how you are billed for your power consumption, once you have selected this, you can fill in the rate details on the other tab(s) in this dialog. If you do not have a change to rate based on season, then will only be one other tab on this window called “All Year Rates”. if you do have multiple season, you can find more information down below in the Seasons and Weekend section below these instructions.
  5. If your rates change based on the season, or period of year you can change this number of season field to create specific rate details based on the time of year, more information below in the Seasons and Weekends section.
  6. If you rate changes on weekend, you can check this box that will add more fields in the rate detail section, more information below in the Seasons and Weekend section.


Seasons and Weekends


Seasons

Changing the number of season will change the number of tabs at the top of this dialog to match the number of season you have selected.


Tabs depicting how the rate profile can be split into different seasons.

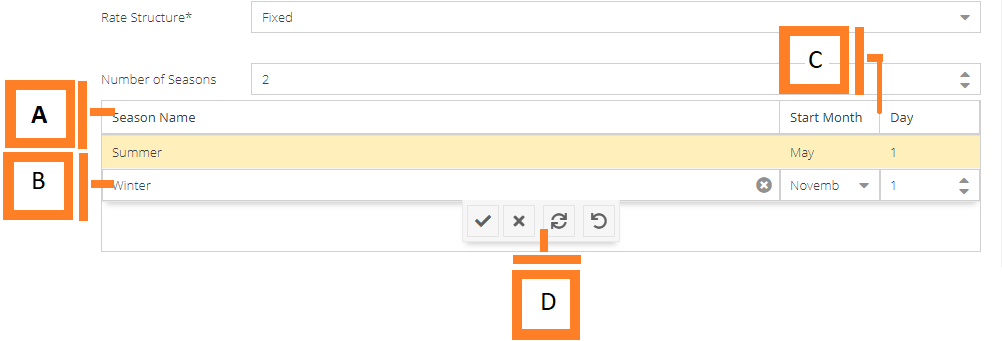
It will also show a new table that is used to name and detail the season you have.

labeled image of the season section of the general setting of a rate profile to match up with the descriptions below.


 FieldHow It’s Used
ASeason TableList of seasons to separate your rate details based on date.
BSeason RowThis row contains a label so you can identify which season it represents, the start month and date to match the changes to your rates. Double clicking anywhere on the row allows you to modify the values stored here. Ensue the labels are descriptive enough so you can distinguish the rows from one another easily.
CRow Edit ControlsWhen editing a row, the start month column becomes a drop down field to make it easier to change the month

The Day column becomes a numerical input field.

DBill Profile SettingsThese controls are used to confirm, discard, or revert the changes you have made to these rows.

The check mark stores it in the table to be saved with the rest of the rate profile. The X discards the changes, and returns to display mode. The two arrows pointing at one another revert the changes back to what the fields were when you started editing the fields, and the circular arrow reverts the values back to the default values.


Weekends

Enabling this box will change the rate details page, it change the name of the rate table to Weekday Rates, and add another table that follows the same rate structure called Weekend Rates. You will have to update the Weekend Rates to match the rates you are paying, to do so follow the same instructions as the rates tables found on the pages connected to the structure you have set.


Yes No
0 of 0 users found this section helpful
Suggest Edit