Select Page

MyEyedro User Guide v5

  1. Introduction
    1. Account Access
    2. Signing In
    3. Signing Out
    4. Help & Support
    5. MyEyedro Mobile
  2. Plugins
    1. Highlights
    2. Demand - Live
      1. Temperature Overlay
      2. Demand Alerts
        1. Demand Threshold Average
        2. Demand Threshold Continuous
        3. Demand Threshold Instantaneous
    3. Consumption
      1. Consumption Alerts
        1. Consumption Threshold
    4. Bills
    5. Reports
    6. Net Meter
    7. Compare
    8. Utility Dashboard
    9. Meter
    10. Asset Intelligence
  3. Tools
    1. Data Exporter
    2. Base Load
    3. Peak Load
    4. Unit Converter
    5. Cost Estimator
    6. Solar Calculator
  4. Configuration
    1. User Configuration
      1. Opening User Configuration
      2. Change Password
    2. Site Configuration
      1. Opening Site Configuration
      2. Add Site
      3. Edit Site
      4. Delete Site
      5. Share Site
        1. Un-Share Site
    3. Rate Configuration
      1. Opening Rate Configuration
      2. Bill Profiles
        1. Add Bill Profile
        2. Edit Bill Profile
        3. Delete Bill Profile
      3. Rate Profiles
        1. Add Rate Profile
        2. Edit Rate Profile
        3. Delete Rate Profile
        4. Fixed Price
        5. Tiered
        6. Time of Use
        7. Daily Tiered
        8. Tiered Time of Use
        9. Other Fees
    4. Device Configuration
      1. Opening Device Configuration
      2. Add Device
      3. Edit Device Settings
        1. Gateway Module
        2. Electricity Module
        3. Pulse Module
        4. Temperature Module
      4. Delete Device
      5. Updating Device Firmware
      6. Active/Inactive Alerts
    5. Display Group Configuration
      1. Opening Display Group Configuration
      2. Add Display Group
      3. Edit Display Group
      4. Delete Display Group
      5. Share Display Group
        1. Un-Share Display Group
      6. Configure Alerts
    6. Report Configuration
      1. Opening Report Configuration
      2. Add Report Profile
      3. Edit Report Profile
      4. Delete Report Profile
      5. Report Types
        1. Net Meter
        2. Usage and Cost
        3. Usage and Cost with Graph
        4. Usage Ranking (Premium)
        5. Renewable Generation Metrics (Premium)
        6. Renewable Generation Ranking (Premium)
        7. Asset Metrics (Pro)
        8. Asset Ranking (Pro)
        9. Device Settings (Pro)
        10. Device Uptime (Pro)
        11. New Users (Branded Site Admin)
        12. User Metrics (Branded Site Admin)
      6. Scheduled Reports
    7. Alert Configuration
      1. Opening Alert Configuration
      2. Edit Alert Options
    8. Asset Configuration
      1. Opening Asset Configuration
      2. Asset Profiles
        1. Add Asset Profile
        2. Edit Asset Profile
        3. Delete Asset Profile
      3. Assets
        1. Add Asset
        2. Edit Asset
        3. Delete Asset
  5. Integrated SmartApps

4.6.2.Add Report Profile #

To add a Report Profile, direct to the Reports Page under Configurations. Under Report Profile List, click ‘Add Report Profile’

Overview of the Report Profile List within Report Settings


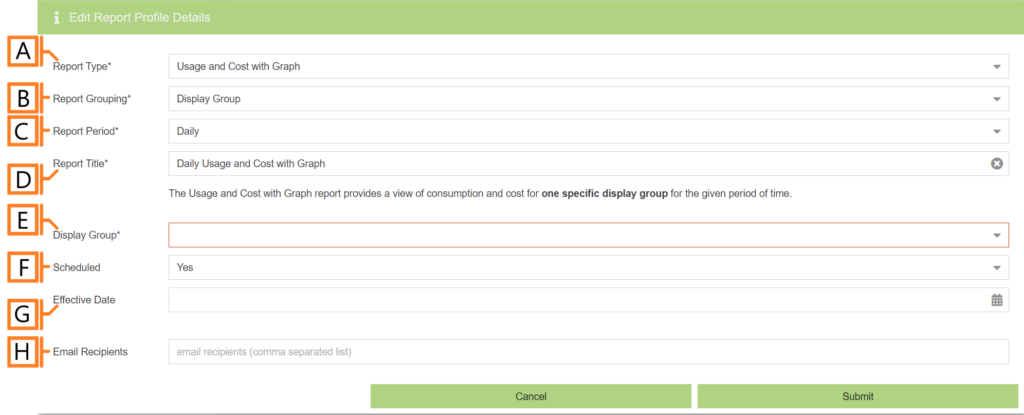
This will open a dialog box to create a new Report Profile, which will look like the following image. Adjusting the Report Type and Grouping will alter the form’s fields.

Note: In-depth configuration options specific to each Report Type can be found within the Report Types section.

Usage and Cost Report Configuration

 FieldHow It’s Used
AReport TypeSpecify the type of report to generate.
BReport GroupingSpecify whether the report will use Display Groups or Sites as a data source.
CReport PeriodThe time frame which the Report will evaluate.
DReport TitleUsed to easily identify what this Report Profile is being used for.
EInclude All Display Groups/SitesCheck to include all Display Groups in

Note: Field disappears when Report Grouping set to Site.

FDisplay Groups/Sites toThe Display Groups/Sites this profile will report on. Can specify selections using Include or Exclude modes.

Note: Can allow Sites or multiple Display Groups depending on the Report Type selected.

GScheduledAutomatically generates a report on the scheduled start day and each period after.
HScheduled Start DateThe first date your report is scheduled to run.
IEmail RecipientsThe Email addresses you wish a copy of the scheduled report to automatically be sent to.
Yes No
0 of 0 users found this section helpful
Suggest Edit