Add Report Profile
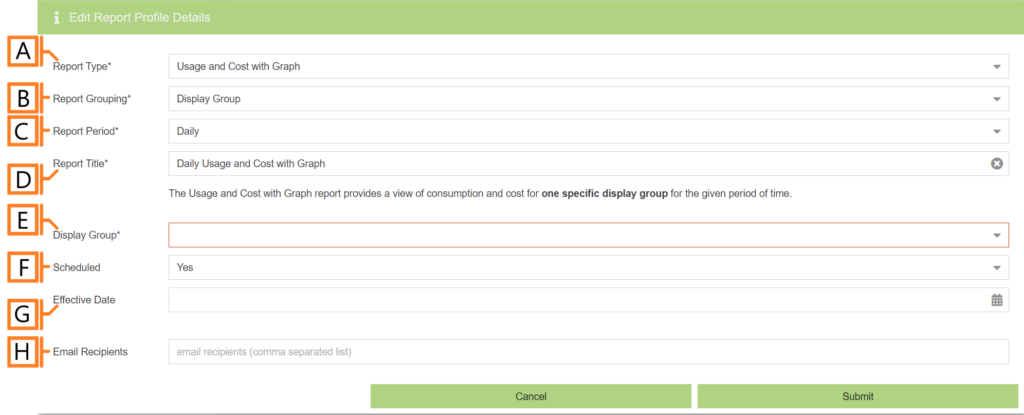
To add a report profile, navigate to the Reports Configuration plugin. Click the ‘Add Report Profile‘ button. This will open a form which is used to specify the details.
NOTE: Not all report types are available to all users. The types of Report Profiles allowed are limited to license key(s) available.
Common Report Profile Configuration
When adding or editing a report profile, the available options depend on the type being created. The common configuration is outlined below. For detailed, report type specific configuration options, refer to the corresponding Report Type sections in this manual.
- Report Type. Specify the type of report to generate. NOTE: Not all report types are available to all users.
- Report Grouping. Specify the type of data source (device, display group, site, etc.). The available groupings are dictated by the Report Type.
- Report Period. The time frame which the Report will evaluate. The available periods are dictated by the Report Type.
- Report Title. Used to easily identify what this Report Profile is being used for. NOTE: this text will be displayed as the first line of the generated report.
- Type specific configuration. Refer to the appropriate section in this manual for details.
- Scheduled. Automatically generates a report on the scheduled start day and each period there after.
- Effective Date. The first date your report is scheduled to run. NOTE: this option is only visible for scheduled reports.
- Email Recipients. The Email addresses you wish a copy of the scheduled report to automatically be sent to. NOTE: this option is only visible for scheduled reports.
After you’re satisfied with the data entered, Click ‘Submit‘. The newly created site will now appear in the list.

