MyEyedro User Guide v4

9.1.Eyedro Electricity Monitor (E*EM1)-v4
Adding an Eyedro Electricity Monitor

- To add new hardware to your user account, follow the Adding a Device (Manually) instructions from the Device Settings.
- Enter the Serial Number from the back of the Eyedro Module.
NOTE: For wireless installations, only the serial number of the Sensor Module is required for this step. - Click the “Claim Device” button.
- On successful completion, the Add New Hardware window will close and your new hardware will appear in your Device List.
NOTE: A Display Group, consisting of all sensors in the new Device, will be automatically created from the newly added hardware.
Device Details
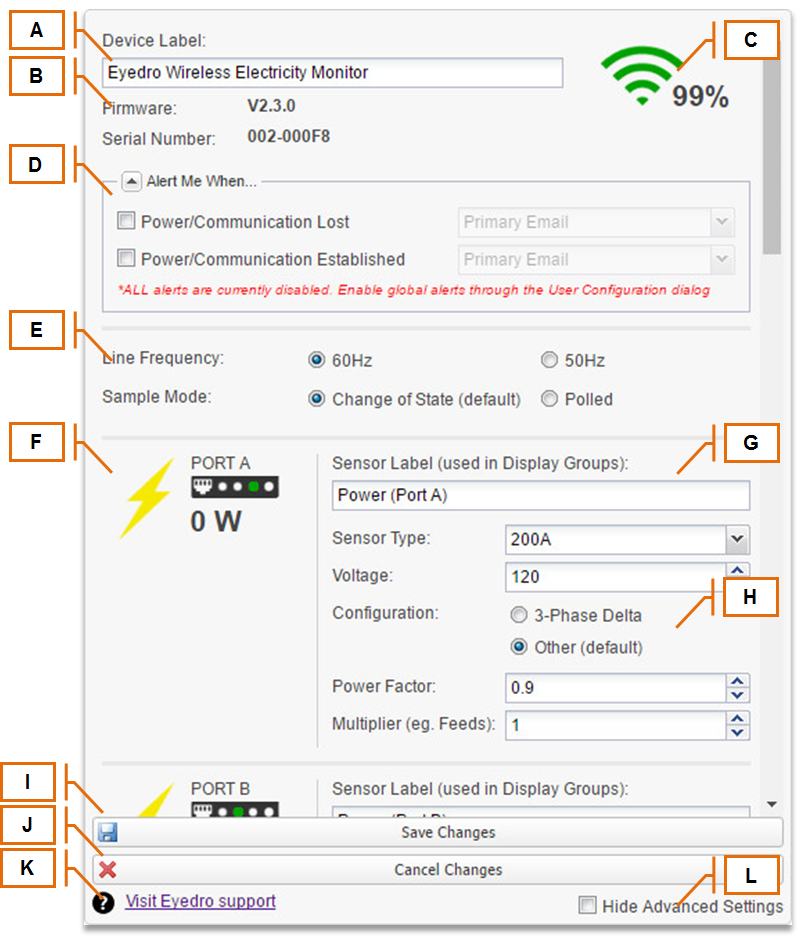
| Field | How It’s Used | |
| A | Device Label | The label that is displayed for the Device. By default, this value is set to “Eyedro {Wireless} Electricity Monitor” but can be changed. |
| B | Device Attributes | Firmware: The current firmware version of the selected Device. Serial Number: The serial number of the selected Device. MAC Address: The MAC Address of the Device. The MAC Address is only shown for Devices with an Ethernet port. |
| C | Wireless Status | Displays the most recent wireless signal quality measurement reported from the module. NOTE: This section will only be displayed for wireless devices. NOTE: This value is signal quality NOT signal strength. If there is no wireless communication between Devices, this value will read 0 regardless of signal strength. |
| D | Alerts | Enable or disable alerts for specific Device events. Power/Communication Lost: Receive alerts when the Device has lost power and/or internet connectivity. This alert will only be generated if the outage exceeds 3-5 minutes to avoid nuisance alerts caused by short internet disruptions (very common). Power/Communication Established: Receive alerts when the Device has reestablished power and communication. NOTE: Alerts must be enabled under User Settings on the user account to receive Device-specific email alerts. |
| E | Device Parameters (Advanced) | Line Frequency: Do not modify this parameter unless you are in a country/region that has a 50Hz line frequency. For North American installations this value should be set to 60Hz. Sample Mode: Changes the method used to sample data. Change of State (COS) only sends data when it detects a change in value. Polled mode sends readings at a fixed interval. The default sample mode is COS and should not be modified unless instructed to do so. If set incorrectly, this setting can have a significant impact on system bandwidth and responsiveness. Poll Rate: When Sample Mode is set to Polled, this specifies the polling rate used for all sensors. Valid settings are between 10 and 900 seconds. Default is 30 seconds. NOTE: These settings will only be displayed if the Hide Advanced Settings option is unchecked. |
| F | Sensor Status | Displays the most recent measurement for the sensor port. NOTE: These sections will only be displayed for Devices with sensors. |
| G | Sensor Parameters | Sensor Label: The label that is used to uniquely identify the sensor. This label will be visible in all Display Groups that you create. By default, this value is set to “Power (Port A|B|C)” but can be changed for easier identification. Copy Settings From Port A|B: Use this button to quickly copy settings from the previous sensor port. All settings, except the Sensor Label, will be copied. Sensor Type: Choose the correct sensor type from the dropdown list. This value will impact the readings from the hardware if chosen incorrectly. Voltage: This value should be set to your average line voltage. It can be measured with a multimeter at the time of installation, following the instructions in the Product Manual, or set to the typical value for your country/region. For typical North American residential installations this value should be approximately 120V. For 3-phase commercial applications, visit the Eyedro Support Website for correct voltage settings. NOTE: These sections will only be displayed for Devices with sensors. |
| H | Sensor Parameters (Advanced) | IMPORTANT! Do not modify these values unless you understand their purpose as they will have a direct effect on all measurements reported from that point forward. Settings: Choose between ‘3-Phase Delta’ and ‘Other’. If the service or load being monitored is a 3-Phase Delta Settings, choose this option. For all other applications (3-Phase Wye or Single Phase), choose the ‘Other’ option. ‘Other’ is selected by default. Power Factor: Allows you to specify the power factor that is applied when computing power (from the constant voltage and measured current). Must be a value between 0 and 1 with 0.9 being a typical setting for an average residential application. Multiplier: Used to provide an additional multiplier on the computed power. For example if a sensor is clamped on a single conductor of a parallel feed. This value is set to 1 by default. NOTE: These settings will only be displayed for Devices with sensors and if the Hide Advanced Settings option is unchecked. |
| I | Save Changes | Click this button to apply any changes made. NOTE: Some changes will require commands be sent to the Device – please make sure the Device is active before applying changes. |
| J | Cancel Changes | Click this button to cancel any changes made. It will reload all the parameters with the last saved values and refresh the display. |
| K | Support Link | Click this link to visit the Eyedro Support Website. |
| L | Hide Advanced Settings | Show or hide Advanced Settings. NOTE: By default, this option is checked so only the most commonly adjusted parameters are displayed. |