
Internet Connection
All Eyedro products are designed to take advantage of the MyEyedro cloud services – thus requiring an internet connection for all products. There is a small amount of internal memory to store data in the event of a temporary disruption to your internet service.
For most networks, it only requires that you connect the device to the network with a DHCP server somewhere on the network. A DHCP server is enabled on most routers by default and will provide connected hardware with an IP address so they can communicate via the internet.
In some cases, additional security has been added to the local network (firewall, port filtering, etc.) making some additional configuration necessary. A good test would be to plug a laptop or computer into the same Ethernet port that you intend to use for your (wired) Eyedro product, or, if installing an Eyedro Wi-Fi product, provision it to connect to the same Wi-Fi network – if you can open a browser and navigate the web no additional configuration is likely needed.
A couple of important notes:
- All Eyedro Wi-Fi devices utilize the 2.4GHz frequency band. Ensure your Wi-Fi router supports 2.4GHz devices. They will not work on 5GHz only Wi-Fi networks.
- Ethernet devices require connection to an active Ethernet port on your router, switch, or hub.
- Ethernet devices ship with Ethernet patch cords (straight-through). Most routers, switches and hubs provide crossover functionality, but some old hardware may not. In those cases, it may be necessary to connect to a specific port or use a crossover cable.
- Generation 6 devices are Ethernet hot-swappable. You can plug the Ethernet cable in at any time to use it. Gen 6 device serial numbers will start with A14-1
- Generation 6 devices are 100BASE-T Full Duplex auto negotiating.
- Generation 5 devices require that the Ethernet cable be plugged in before applying power to the device. Gen 5 device serial numbers will start with A14-0
- Generation 5 devices are 10BASE-T Half Duplex.
- All devices require a DHCP server somewhere on the network.
- If your network does not have a DHCP server, or it is restricted, you may need to reserve an IP address for the device based on the MAC address of the device.
- If you require static network parameters to be set on your device, contact support for help.
- All devices communicate using port 80 (HTTP) – all communication to/from the device looks like standard web traffic.
- If you have changed the DNS settings in your router (i.e., to use an ad blocker), try switching back to use the default settings. Alternately use Google’s DNS servers 8.8.8.8 (primary) and 8.8.4.4 (secondary)
Wi-Fi Internet Connection
- Using a phone, tablet, or computer, disconnect from your current Wi-Fi network.
- It may be necessary to explicitly deselect ‘auto-connect’. Failing to do so may cause the provisioning device to switch back to its original network during provisioning.
- If your device has an alternate path to the internet (i.e., cellular), it may be necessary to disable that network connection during provisioning (i.e., turn off cellular).
- It may be necessary to temporarily disable your virus scanner during provisioning.
- Using the same phone/tablet/computer, search for available Wi-Fi networks and connect to the Wi-Fi network created by your Eyedro device.
- The name of the created network will be “Eyedro [xxx-yyyyy]” where xxx-yyyyy matches the serial number of the device.
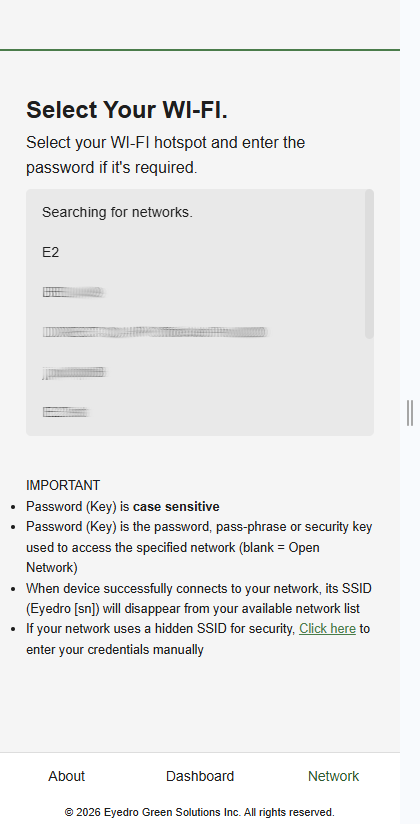
- Once connected, you should be automatically redirected to the Select Your Wi-Fi page on the Eyedro device.
- If not automatically redirected to the setup page, try the following:
- Click ‘Sign in to Eyedro [xxx-yyyyy]’ if presented.
- Open a browser and enter 192.168.1.1 in the browser URL.
- If not automatically redirected to the setup page, try the following:
- Choose the desired Wi-Fi network from the list.
- IMPORTANT: If the desired network is not listed, ensure that the Eyedro device is within range of your wireless router and has not been sealed up inside of a metal panel that could affect it’s wireless signal quality.
- NOTE: If the desired Wi-Fi network is hidden, click the ‘Click here‘ link at the bottom of the page to be directed to a page where you can enter both the SSID and Password.
- Once your desired Wi-Fi network has been selected, you will be directed to the Connect to Network page. Enter the password and click Connect.
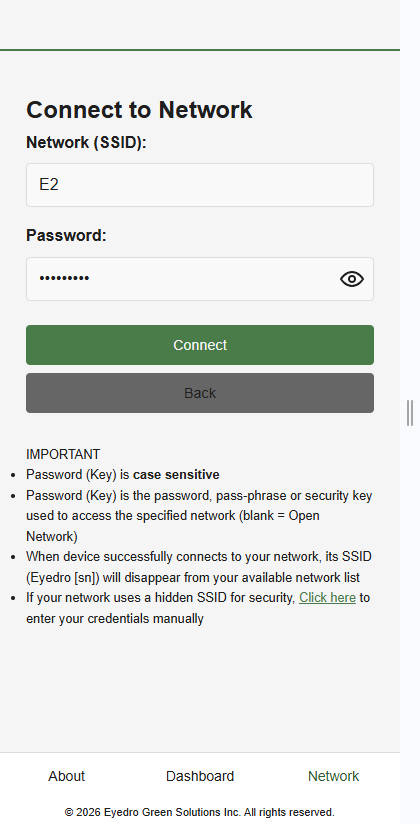
- Connection status information will be presented to indicate progress during network negotiation.
- On successful connection, your provisioning device (phone, tablet or computer) will disconnect from the Eyedro device.
- The Eyedro device’s network will also no longer appear in your available Wi-Fi networks list.
- Reconnect your phone, tablet, or computer to your original Wi-Fi network.
- Don’t forget to re-enable your cellular connection and/or virus scanner if you turned them off during provisioning.
IMPORTANT: If the setup is not successful, the device will recreate its own network and reappear in your available network list. Your device must be connected to the internet before you will be able to claim it on your MyEyedro Account.
Troubleshooting
When applying power to the device it will run through its startup tests. Approximately 10 seconds after power has been applied, the status lights will indicate the status of the communication:
- Red/Green (both) toggle 2 seconds on/off = Not connected.
- SSID, “Eyedro [xxx-yyyyy]”, should be visible in your available Wi-Fi network list.
- Green toggle 2 seconds on/off = Connected.
- Device is connected to the provisioned network and should appear as ‘Active’ in MyEyedro.
If the status lights are still not green (connected) after following the procedure, cycle power to the Eyedro device and try the procedure again – carefully following all instructions and notes.
Additional Resources
Wi-Fi setup from a computer – Video
Wi-Fi setup from a mobile device – Video
Wi-Fi setup for Android – Video
Wi-Fi setup for iPhone – Video
Connection How-To – Post
MyEyedro Device Installation – User Guide
eyedro.com/support – General Support