
Pulse Monitor Settings | MyEyedro User Guide
To edit a the settings for a Pulse Monitor, navigate to the Devices Configuration plugin and choose the desired device from the list. A device type specific editor will open.
NOTE: Some settings and pages below, denoted by “(advanced)“, are only visible with the Show Advanced Settings options checked in the plugin options.
Sensor Settings
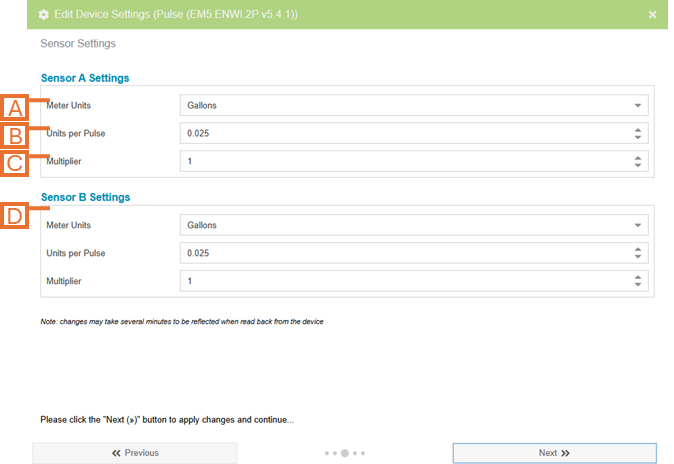
- Meter Units. The units of measure for the meter data.
- NOTE: This should match the meter. Displayed unit preference can be set independently in the Display Groups configuration.
- Units per Pulse. The number of data units represented by each pulse. Often referred to as the “K-Factor”.
- NOTE: For dry contact pulse outputs, this is often indicated on the outside of the meter. Refer to the meter manufacturers documentation. If you are unable to find the value, follow the K-Factor calculation process for gas/water flow meters outlined in the Flow Meter Installation and Product Guide.
- NOTE: For gas/water flow meter installations, this is the computed K-Factor. Refer to the process outlined in the Flow Meter Installation and Product Guide for details.
- WARNING: This value is not a time series. Adjusting this value will force the device to go all the way back through the historical data to re-calculate volume. Depending on the age of the device and the amount of data collected, this could take a long time.
- Multiplier (advanced). An additional multiplier to be applied to your current reading.
- WARNING: This value is not a time series. Adjusting this value will force the device to go all the way back through the historical data to re-calculate volume. Depending on the age of the device and the amount of data collected, this could take a long time.
Advanced Settings
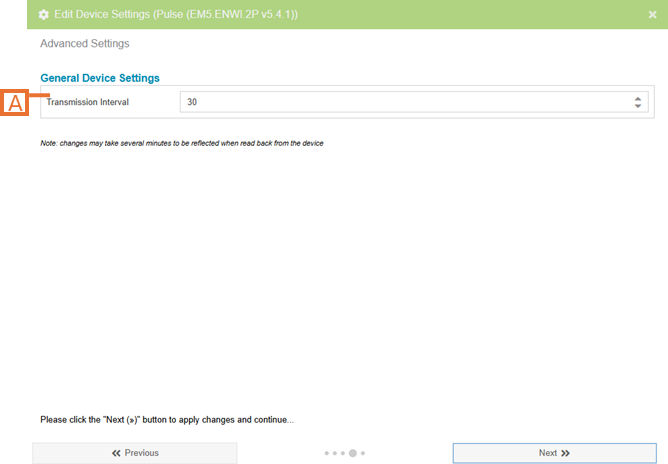
- Transmission Interval (advanced). The period, in seconds, over which the pulses will be counted and a new data point will be captured.
K-Factor Calculator tool
A meter K-factor is determined by dividing the total pulses generated by a flow meter by the known unit volume (e.g., gallons or liters) that passed through it during calibration, typically expressed as pulses/gallon or pulses/liter. This value is required to convert the pulses measured by the Eyedro Flow Meter into volumetric and flow rate units for presentation in the MyEyedro Cloud service.
On common method to determine the K-Factor of the flow meter is to perform on-site calibration which involves running a known volume of gas or fluid through the meter and capturing the number of pulses generated by the Eyedro Pulse Meter and using the two values to compute the K (= Total Pulses / Total Volume).
Performing On-Site Calibration for Eyedro Pulse Meters
- Capture two readings directly from your water or gas meter; one at the start and one at the end of a period of time. Follow the procedure outlined in the Determine Meter K-Factor article of the Flow Meter product guide.
- Use the K-Factor Calculator tool in MyEyedro to compute the K-Factor from the data captured above.

- Navigate to the Devices Configuration plugin
- Select the pulse metering device you would like to calculate the K-Factor for
- NOTE: The K-Factor Calculator is not available for all generations of Eyedro Pulse Meter devices.
- Click on the K-Factor Calculator button at the bottom of the Device Info panel
- Choose the desired Sensor Port
- Verify Meter Units are set correctly
- NOTE: If the units are incorrect, be sure to correct it when copying the value from the last step into the device settings.
- Enter the date, time and reading value captured from the first (starting) reading
- Enter the date, time and reading value captured from the second (ending) reading
- Click on the Retrieve Pulse Data and Calculate K-Factor button
- NOTE: This can take several seconds to minutes depending on the period of time and amount of data between the two readings
- Click on the Copy to Clipboard button to store the computed K-Factor on the clipboard or simply note the computed value
- Click on the Done button to close the tool and return to the Devices Configuration plugin
- Click on the Edit Device button (above the K-Factor Calculator button from step 2) to open the device settings editor (or wizard)
- Navigate to the Sensors tab
- Paste the K-Factor from above in the Units per Pulse field of the appropriate sensor
- Click on the Submit button to save your changes to the device settings
- NOTE: This will force all of the calculated volume and flow data collected by the pulse meter to be recalculated using the new K-Factor value. Depending on how long this device was actively collecting data, this may take several minutes to complete
Legacy Device Settings
Some older generations of Eyedro hardware (e.g. EBEM1-PM, EBWXS3-PM) do not support the most recent features and functions available in the hardware and software. However, these devices can still be accessed and configured using the “old” setup screen(s).
As with all electronic products, emerging technologies, part(s) and technology obsolescence and general electronics life span issues are things that affect all of us (when is the last time you upgraded your phone or Wi-Fi router?). It is recommended to update any legacy devices in use.
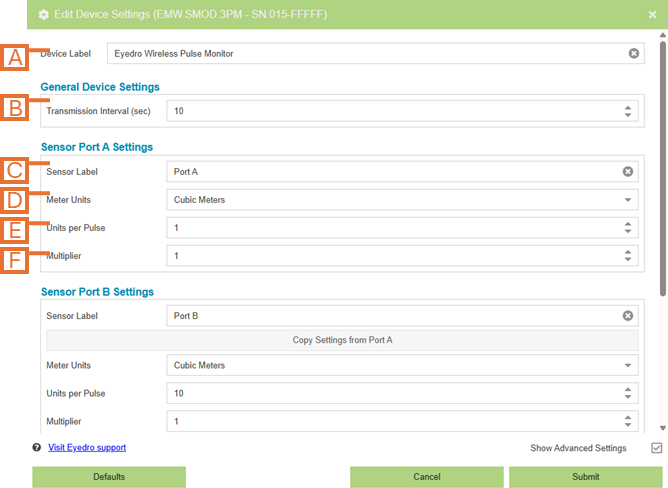
- Device Label. Label should be unique and descriptive for easy identification.
- Transmission Interval (advanced). The period, in seconds, over which the pulses will be counted and a new data point will be captured.
- Sensor Label. A user defined label for identifying this sensor.
- Meter Units. The units of measure for the meter data.
- NOTE: This should match the meter. Displayed unit preference can be set independently in the Display Groups configuration.
- Units per Pulse. The number of data units represented by each pulse.
- NOTE: Often indicated on the outside of the meter. Refer to the meter manufacturers documentation.
- WARNING: This value is not a time series. Adjusting this value will force the device to go all the way back through the historical data to re-calculate volume. Depending on the age of the device and the amount of data collected, this could take a long time.
- Multiplier (advanced). An additional multiplier to be applied to your current reading.
- WARNING: This value is not a time series. Adjusting this value will force the device to go all the way back through the historical data to re-calculate volume. Depending on the age of the device and the amount of data collected, this could take a long time.