
Intermittent or missing measurements | Troubleshooting Guide
If you notice intermittent or missing measurements or communication with an Eyedro device, it could indicate an issue with; the environmental conditions, internet connectivity or power quality. Symptoms can include:
- 0 values when viewing live data
- Missing data from historical data views
- Frequent lost communication alerts
- Inactive status indication
To troubleshoot intermittent readings, follow the steps outlined below. However, before proceeding, first verify that the firmware on your Eyedro device is up-to-date:
- If applicable, click the Update Firmware button and follow any instructions or prompts presented.
- Open MyEydro and log into your user account.
- Navigate to the Device Configuration plugin.
- Select the desired device in your device list.
- From the Device Info panel, you will see a field called “Firmware Version“. If a more recent version of Eyedro device firmware is available, an “Update Firmware” button will appear directly beside it.
- If applicable, click the Update Firmware button and follow any instructions or prompts presented.
IMPORTANT: These steps assume that the device has can and does establish internet connectivity. If your device has never been actively connected and collecting data, refer to the No Internet section of the troubleshooting guide for instructions.
PRO-TIP: In general, if when the device comes back online (active) it fills in most/all of the data from the missing periods, the issue is most likely related to the internet connectivity. However, if when the device comes back online, the data from the period is missing, this usually indicates that the device has lost power for some reason.
All Eyedro devices must operate within the specified temperature range of 0°C to 50°C (32°F to 122°). If the device is installed in an unconditioned space (such as a garage, outbuilding, or uninsulated outer wall), placed in direct sunlight or near a heating or exhaust source or if the operating environment is close to one end of the operating range, try relocating it if possible.
Additionally, all Eyedro devices must be installed indoors. If your device is outdoors, move it.
A common side-effect of extreme hot or cold conditions, aside from possible device damage, is intermittent measurements with missing data. In extreme conditions, the device shuts down to avoid physical damage. Often the device will reestablish a connection when the extreme conditions pass (i.e., it warms up, cools down, the sun goes down, etc.).
Product Specifications (with Operating Conditions)
- Home Energy Monitor (EYEDRO-HOME)
- 3-Phase Energy Meter (e.g. EB6-*)
- Inline Power Meter (e.g. ILM-*)
- Flow Meter (e.g. E5B-*-PM)
- Temperature Meter (e.g. E5B-*-TM)
At a time when the device is in the inactive state:
- Open MyEydro and log into your user account.
- Navigate to the Device Configuration plugin.
- Locate the desired device in your device list.
- Ensure the device status is currently displaying Inactive beside the device you are troubleshooting.
- Locate the physical Eyedro device and see if the status lights are visible and flashing.
- If status lights are on and/or flashing, the device has power. This indicates that the issue is likely related to internet connectivity.
- Continue on to step 3 to verify the internet connectivity.
- If status lights are off, the device has no power.
- Confirm the operating environment (step 1).
- Jump to step 4 to verify the voltage.
- Review the No Power section of the troubleshooting guide for additional tips and instructions.
- If status lights are on and/or flashing, the device has power. This indicates that the issue is likely related to internet connectivity.
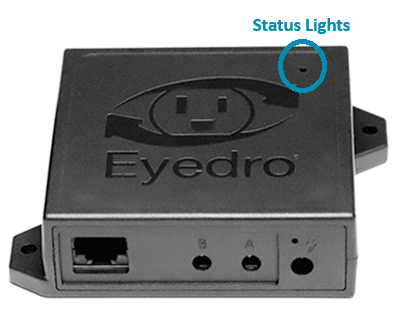
For all Electricity, Flow and Temperature monitoring products, the status lights can be seen by looking through the small opening in the top right corner of the device surface.
PRO-TIP: If possible, ensure that your network router is running the most recent firmware version available from the manufacturer. Refer to your router’s user guide and/or support resources for instructions. You can often access the router’s administrator dashboard directly from a web browser by entering 192.168.1.1 or 192.168.0.1 in the URL bar. However, ensure the device (laptop, computer, phone) you are using is connected to the same network as the Eyedro device. Refer to your router’s user guide for device specific instructions.
Wi-Fi Connectivity
Is the device’s Wi-Fi network visible?
- Go near the Eyedro device.
- From your phone or laptop, open the available Wi-Fi networks list.
- Do you see the the network created by the Eyedro device in the list of available networks? It will appear in the list as “Eyedro [serial]“.
- Are the status lights flashing both red and green (together) at a one second interval?
- NOTE: After several minutes of inactivity (i.e. not communicating with the Eyedro cloud services), the device will toggle the lights; red for 3 seconds green for 1 second. This indicates that the device is operating in store and forward mode. In this mode, the device has filled its internal memory and is storing measurement data in internal non-volatile memory for transmission to the cloud service when a connection has been reestablished. If may be necessary to cycle power to the device to observe the pattern of the status lights prior to the device entering store and forward mode.
If you see the Eyedro device’s network in the list or the status lights are flashing as indicated, it means that the device it is not able to connect to the Wi-Fi network provided. Often this indicates a wireless signal strength issue. If possible, try relocating the Eyedro device (with power supply) closer to the router.
What is the wireless signal strength?
For Eyedro devices that are connected to the internet using Wi-Fi, check to see what the signal strength is showing. This step requires that the device is connected and actively collecting data at the time it is checked.
- Open MyEydro and log into your user account.
- Navigate to the Device Configuration plugin.
- Select the desired device from your device list. NOTE: The status column of the device list indicates if the device is currently Active (connected to the internet and collecting data) or Inactive (not connected).
- If the device is Active:
- Observe the color of the wireless icon located in the top-right corner of the Device Info panel
- Hover your pointer over the wireless icon in the top-right corner of the Device Info panel to see the actual wireless signal strength. You will see a number (-20dBm to -80dBm) and a status (excellent to poor)
- If the device is Inactive, you will not be shown the wireless signal quality.
Tips to improve poor wireless signal strength
All Eyedro devices with Wi-Fi connectivity utilize the 2.4GHz frequency band. This has better range and wall penetration than 5GHz however, that specific frequency can sometimes be very crowded. Below are some suggestions to help improve the signal strength and boost your signal quality.
- Optimize the placement of the Eyedro device.
- Do not mount it inside of an enclosure or panel.
- Do not mount it directly on a metal object.
- Do not allow it to hang freely from the cables.
- If possible, try to mount it with the top surface of the device (the logo) facing towards the router.
- If possible, optimize placement of the router.
- Centralize it by placing it in the middle of the coverage area.
- Do not tuck it inside of a cabinet or directly behind something.
- Elevate it. Place it or mount it up high.
- If your router has external antennas, try pointing one vertical and one horizontal.
- Reduce interference
- Bluetooth devices operate on 2.4GHz. If you have a bunch of Bluetooth devices near the router or Eyedro device, they can cause packet loss. If possible try disabling or relocating them.
- Other IoT wireless device protocols such as Zigbee and Thread also share the 2.4GHz spectrum.
- If possible, change the wireless channel of your router from the router’s administrator dashboard.
- Use a free “Wi-Fi Analyzer” app on your phone to see which channels are most congested in the area of your Eyedro device.
- Try changing the channel of your router to use one of the less crowded channels. In the 2.4GHz spectrum, only channels 1, 6 and 11 do not overlap with each other. If possible try to use one of these channels.
- If possible, perform some additional technical tweaks from the router’s administrator dashboard.
- Set the channel with of the 2.4GHz channel to 20MHz instead of 40MHz.
- Update the router firmware.
- Increase the transmit power.
PRO-TIP: You can often access the router’s administrator dashboard directly from a web browser by entering 192.168.1.1 or 192.168.0.1 in the URL bar. However, ensure the device (laptop, computer, phone) you are using is connected to the same network as the Eyedro device. Refer to your router’s user guide for device specific instructions.
Ethernet Connectivity
- Disconnect the Ethernet cable from the Eyedro device and check both the connector on the cable and the jack on the module for visible signs of damage or debris.
- If the cable pins or retention clip is damaged, replace the cable.
- If the cable pins or device jack have visible debris, clean with isopropyl alcohol. IMPORTANT: Ensure power is disconnected from the Eyedro device before cleaning. Wait for the alcohol to fully evaporate before reconnecting.
- If the jack pins or or socket are damaged on the device, contact Eyedro support for additional steps.
- Reconnect the cable securely to the Eyedro device.
- Disconnect the Ethernet cable from the network router or switch and check both the connector on the cable and the jack on the router or switch for visible signs of damage or debris. Follow the same inspection and cleaning steps as performed on the opposite end of the cable.
- Reconnect the cable securely to the router or switch.
- Inspect the entire length of Ethernet cable to look for any damage.
- If the above fails to resolve the issue, if possible:
- Plug the Ethernet cable into a different port on your router or switch and/or swap ports with a different device on the network.
- Replace the Ethernet cable with a different one.
- If using a very long Ethernet cable, try moving the Eyedro device closer and test with a shorter cable.
- Ensure your network router or switch supports the required Ethernet standard
- Generation 5 and lower devices: 10BASE-T (Half Duplex) Ethernet
- Generation 6 and higher devices: 100BASE-T Full Duplex
PRO-TIP: If you are not sure what generation hardware you have, use the Device Serial Lookup on the support page. You can also get the information from the device info using MyEyedro’s Device Configuration plugin. Contact support if you are unable to find what you are looking for and someone from our team will be happy to help.
Alternative Connectivity Method
If possible, try switching to the alternative connectivity method. If currently connected by Wi-Fi, switch to Ethernet and, if currently connect by Ethernet, switch to Wi-Fi. Do both connection methods have the same result? If so, this could indicate an issue with the router or Eyedro device or an incompatibility between them. Contact support, providing details of the Eyedro device (model and serial) as well as the details of the network equipment (router manufacturer, model, approximate age) that you are connecting to.
If you are able to get connectivity with the alternative connection method, this is a good time to make sure your Eyedro device it running the most recent version of firmware. Refer back to Step 2 for instructions on updating the device firmware.
Advanced: Connected Device List (from Router Admin page/app)
- Navigate to the administrator dashboard for your network router. Refer to the user guide of your router for instructions.
- Locate the Connected Device List on your router. Refer to the user manual for
- Look for the Eyedro device in the list of connected devices. The device name displayed should be EYEDRO-{serial} with the manufacturer name Eyedro Green Solutions Inc.
- Check the assigned IP address for the Eyedro device and ensure it doesn’t conflict with another device on the same network.
- While connected to the router’s admin
PRO-TIP: You can often access the router’s administrator dashboard directly from a web browser by entering 192.168.1.1 or 192.168.0.1 in the URL bar. However, ensure the device (laptop, computer, phone) you are using is connected to the same network as the Eyedro device. Refer to your router’s user guide for device specific instructions.
Review voltage measurements (electricity monitoring devices only)
- Open MyEydro and log into your user account.
- Navigate to the Demand plugin. NOTE: description of the plugin and its options can be found here.
- If not already visible, open the plugin options by clicking the gear in the top-right corner.
- Set the Display Data for option to the appropriate display group associated with the device.
- Set the Display Type option to Voltage (V).
- Using the Date picker and/or the previous/next navigation buttons, navigate through the data history.
- Note any anomalies in the voltage data measurements. Typically this voltage should be around 120V AC for typical North American installations however it will fluctuate throughout the day. If it is more than 126V or less than 110V, it may be causing the problem. If possible, follow the instructions below to confirm the measurement using a multimeter.
Measure voltage with a multimeter
If available, use a multimeter to measure the voltage:
- Measure the voltage at the receptacle. You should see approximately 120V AC. NOTE: this measurement should be taken at the receptacle that the Eyedro device is plugged into. Temporarily disconnect the device to take the measurement.
- Measure the output of the power supply. Ensure the measured output matches the rating indicated on the serial label of your Eyedro device (6VAC or 5VDC). NOTE: When the power supply is unloaded (not connected to the Eyedro device), it will measure slightly higher than what is expected (e.g. a 6VAC power supply will measure closer to 7VAC when unloaded).
PRO-TIP: When measuring with a multimeter, make sure your meter is using the correct setting; AC voltage setting for receptacle measurement, AC voltage setting for 6VAC power supplies and DC voltage setting for 5VDC power supplies.
PRO-TIP: When measuring the output of the power supply, you will likely need a small gauge wire that you can gently push inside the barrel connector opening. Do not force the meter probe directly into the end of the connector as it may cause damage.
More Help
If the above content doesn’t help you resolve your issue, contact support and one of our team members will help you resolve the issue.