
Wi-Fi Setup | Troubleshooting Guide
All Eyedro products require an internet connection to use the MyEyedro cloud services. To set up a new Wi-Fi connection or update your existing settings, follow the specific procedure for your use case below.
Initial Wi-Fi Setup
- Cycle power to your Eyedro device by unplugging the power adapter and then plugging it back in.
- Wait approximately 10 seconds for the device to go through it’s startup procedure.
- Once powered up and ready, ensure both the red and green device lights are flashing on and off together at a 2 second interval (Green and red lights on for 2 seconds, off for 2 seconds). This indicates that your device has created it’s own Wi-Fi network and is waiting for connection. At this point you should see the network created by the device in your available Wi-Fi networks list.
- Follow the Wi-Fi provisioning procedure for your device:
- Home Energy Monitor (EYEDRO-HOME)
- 3-Phase Energy Meter (e.g. EB6-*)
- Inline Power Meter (e.g. ILM-*)
- Flow Meter (e.g. E5B-*-PM)
- Temperature Meter (e.g. E5B-*-TM)
Changing Your Wi-Fi Settings
If your Eyedro device can no longer connect to the internet because your network settings have changed, please follow the appropriate steps below:
Scenario 1: New Network Name (SSID)
- Use this if: You changed your Wi-Fi name, or you moved the device to a new location.
- Solution: Follow the standard Wi-Fi Setup procedure found at the top of this page to reconnect your device.
Scenario 2: New Password Only (SSID stayed the same)
- Use this if: Your Wi-Fi name is the same, but you updated the password.
- Solution: Follow the step-by-step instructions from one of the methods below to update your device’s security credentials.
Method 1 (Recommended): Provision Wi-Fi using temporary Ethernet connection
PRO-TIP: This method can also be used in the event that, for some reason, you are not able to get the Wi-Fi setup on your new device.
- Disconnect power from the Eyedro device.
- NOTE: If necessary take the Eyedro device, and its power adapter, to a nearby network router or switch if you do not have an Ethernet connection at the installation location.
- Connect an Ethernet cable between the Eyedro device and an open network port on your router or switch.
- Apply power to the Eyedro device.
- Wait approximately 10 seconds for the device to go through it’s startup procedure.
- Once powered up and ready, ensure the green device light is flashing on and off at a 2 second interval (Green light on for 2 seconds, off for 2 seconds). This indicates that your device is successfully connected to the internet.
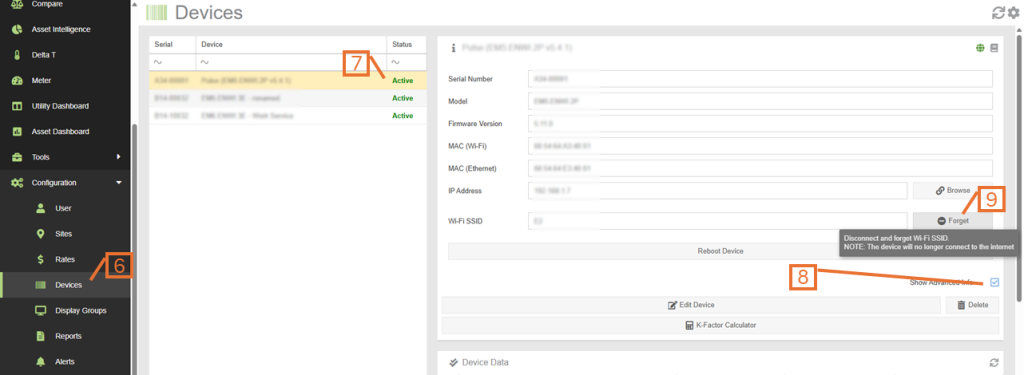
- From MyEyedro, browse to the Devices Configuration plugin.
- Select the Device from the list of devices.
- NOTE: The device status column should show “Active”.
- PRO-TIP: If this is a new device, that you are setting up for the first time, you will first need to add the device to your user account. Follow the procedure outlined in the Add Device article.
- From the Device Information panel, ensure the “Show Advanced Info” option is checked.
- If the Wi-Fi SSID field displays anything but “None”, click on the Forget button beside the field.
- Provision the Wi-Fi settings while still connected using an Ethernet cable by continuing with the steps below.
- Alternatively, at this point, you can disconnect the Ethernet cable, cycle power and provision the device normally, as described above in Scenario 1.
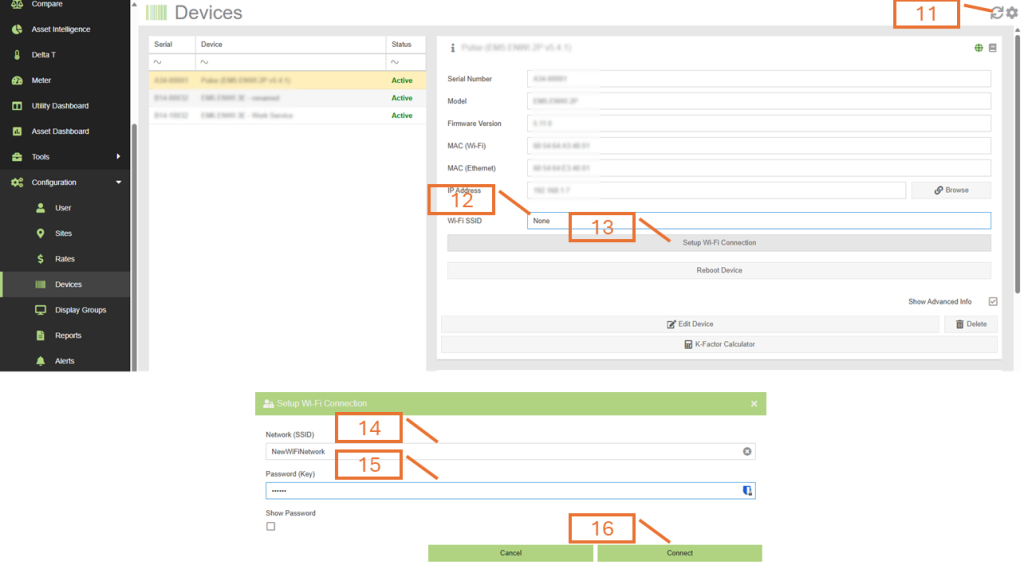
- Click on the Refresh button, in the top right.
- Ensure the Wi-Fi SSID field shows “None“.
- NOTE: It may take several seconds for the previous Forget command to make it down to the device and for it to reset. You may need to click on the Refresh button a couple times until the Wi-Fi SSID indicates “None”.
- Click on the Setup Wi-Fi Connection button.
- Enter the Network name (SSID) appropriate field. IMPORTANT: SSID is case sensitive.
- Enter the Password in the appropriate field. IMPORTANT: Password is case sensitive.
- Click on the Connect button.
- Disconnect the Ethernet cable from the Eyedro device.
- Cycle power to the Eyedro device.
- Wait approximately 10 seconds for the device to go through it’s startup procedure.
- Once powered up and ready, ensure the green device light is flashing on and off at a 2 second interval (Green light on for 2 seconds, off for 2 seconds). This indicates that your device is successfully connected to the internet.
- Click on the Refresh button (from step 11) and verify the following:
- The Status column for the selected device show Active
- The connection icon switches from a green globe to a wireless strength icon. NOTE: If you hover over this icon, it will show the wireless signal strength.
- If necessary, move the Eyedro device and its power adapter back to the original installation location and reconnect it.
Method 2: Temporarily disable your Wi-Fi network
- Turn off your Wi-Fi router.
- Alternatively, temporarily move your Eyedro device, with power adapter, far away from the Wi-Fi router so that it is out of range.
- Cycle power to your Eyedro device by unplugging the power adapter and then plugging it back in.
- Wait approximately 10 seconds for the device to go through it’s startup procedure.
- Once powered up and ready, ensure both the red and green device lights are flashing on and off together at a 2 second interval (Green and red lights on for 2 seconds, off for 2 seconds). This indicates that your device has created it’s own Wi-Fi network and is waiting for connection. At this point you should see the network created by the device in your available Wi-Fi networks list.
- Follow the Wi-Fi provisioning procedure for your device – With the exception noted below:
- Home Energy Monitor (EYEDRO-HOME)
- 3-Phase Energy Meter (e.g. EB6-*)
- Inline Power Meter (e.g. ILM-*)
- Flow Meter (e.g. E5B-*-PM)
- Temperature Meter (e.g. E5B-*-TM)
- EXCEPTION: When you reach the step where you choose the Wi-Fi network from the list, it will not be shown in the list – because you turned your router off. Instead:
- Click on the “Click here” link, from the note regarding hidden networks (at the bottom of the list).
- Enter the Network name (SSID) appropriate field. IMPORTANT: SSID is case sensitive.
- Enter the Password in the appropriate field. IMPORTANT: Password is case sensitive.
- Click on the Connect button.
- Turn on your Wi-Fi router and wait for it to go through its startup routine.
- Or, if you moved your Eyedro device, move it back to the original installation location.
- Cycle power to your Eyedro device.
- Once powered up and ready, ensure the green device light is flashing on and off at a 2 second interval (Green light on for 2 seconds, off for 2 seconds). This indicates that your device is successfully connected to the internet.